Friday, August 28, 2015

BOY OH BOY FOLIO

After making three foto folios, here comes a mini! I purchased the mini version of the foto folio series tutorial from Kathy Orta of Paper Phenomenon and I love, love, love it! The album measures 7x9 inches and has some little additional features.

I used style #6 - The Single Fold Folio and made it for a little boy's little moments. For the paper collection, I used Boy oh Boy by Carta Bella and for the pocket cards, I used A Kid's Life 3x4 and 4x6 pocket cards from Me and My Big Ideas. And of course, kraf-tex for the spine.

I just made the cover simple. I just layered some patterned paper and used the stickers from the collection.


It opens up like this,


There are two stacked pockets on the left side with photo mats/tags inside and an expandable envelope on the right side.


And on the left side, it still opens up like the picture below, and it has two more pockets and two photo mats/tags inside and a large pocket in the middle with two large photo mats/tags.


You can pull out the expandable envelope, that also has pockets and photo mats. And on the right side page, it opens up like shown on the third picture and has a large pocket with a photo mat inside. And you can pull the first page to the right to reveal a hidden page where you can also put photos or journal.


And I just mat the back with a patterned paper and put my logo below.


This is a mini but still you can put tons of photos because there are many pull-outs on this album and I also gave a generous 2 1/2 inches spine.

You can watch the youtube video for this album here,


I hope you all like it!

Thank you for stopping by!

**This album is for sale, if you're interested just leave a comment on the comment box or you can click order on the menu and fill up the fields**


And as I always say, after all has been said and done, all we have are memories, right? so CREATE, CREATE, CREATE and put it on a SCRAPBOOK page!  -scrappy mommy ;)


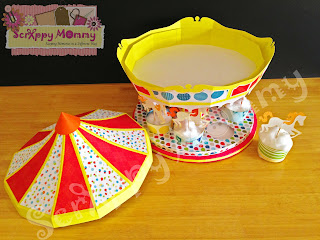
3d Carousel

Who wouldn't love a carousel?  It is just very pretty with all the colors and lights. And isn't it a wow factor if you have a carousel for a cupcake holder in your parties? Or a carousel for a table centerpiece? Yeah, I've imagined that too! hihi.

I made this using SVGcuts Carousel Ride Kit. I used my left over papers from the birthday folio that I made for my daughter's first birthday. I used Bo Bunny Surprise paper collection.


This sample is 11" tall and 11" in diameter. It can hold 8 cupcakes. The tent is a lid that you can lift off and you can put other things inside and has horses. This is perfect for birthdays and baby showers. I had a bit difficulty assembling the two bottom trays, but all turned out to be pretty. As I've said, I just used my scraps on this, but I can be creative and add some blings and embellishments to fit a theme that I want. And I can also put a turn table underneath to make it move like a real carousel ;) but I didn't find any when I made this one.


I hope you all like it!

Thank you for stopping by!


**This is only available locally here in Doha**


And as I always say, after everything has been said and done, all we have are memories, right? so CREATE, CREATE, CREATE and put it on a SCRAPBOOK page!  -scrappy mommy ;)


3d Gazebo

The next one I made is the Gazebo! I'm just in love with gazebos! I just made it simple and classic using SVGcuts Winter Gazebo Kit. The kit includes a gazebo, a 3d ice skates that you can hang, 2 gift boxes and a card.


The gazebo measures 9 1/2", the box is 11 1/2" and it's approximately 14" tall. I used DCWV The Old World Stack for the gazebo and gazebo base and DCWV The Garden Tea Party stack paper collection for the box underneath the gazebo. 


Perfect for weddings as a gift, table centerpiece (can put light inside the gazebo and cover the door and windows), candy buffet table or cake table decor piece. This can also be a home decor piece and you can put light stuffs inside the box underneath the gazebo. SVGcuts has tutorials for all their 3d projects, even the cards and boxes that are spot on and very easy to follow. I had fun assembling this! 

I hope you all like it!

Thank you for stopping by!


**This is only available locally here in Doha**


As I always say, after everything has been said and done, all we have are memories, right? so CREATE, CREATE, CREATE and put it on a SCRAPBOOK page!  -scrappy mommy ;)


3d Paper Hot Air Balloon

Project Share:

One day, I'm searching on the internet for free svg files that I can use for scrapbooking and found SVGcuts website(www.svgcuts.com) and fascinated by all the 3d paper crafts they have on their shop. They have a lot of free svg files that you can use for scrapbooking or any paper crafts. I started buying their patterns and first bought the Highskies Kit. The kit includes a hot air balloon, a gift box, favor box and cards.

I made the hot air balloon first. I saw my daughter's minnie mouse stuffed toy and made it as an inspiration for the hot air balloon theme. I used black and white cardstock for the balloon and the basket. Hot pink cardstock for the banner and put some rhinestones on the dots. I made a bow using a satin ribbon and punch 1/8 circles to achieve a polka dot bow ;). I also used hot pink yarn.


And then I made another one using Echo Park Getaway paper collection and Memory Keepers bakers twine.


You can use this piece on different ways. You can make it as a home decor piece, like placing three or more pieces of this on a children's room. Can be given as a party favor or souvenir, or make it a table centerpiece, candy buffet or cake table decor piece, even a venue decor piece by hanging a lot of this on the ceiling. 


I hope you all like it!

Thank you for stopping by!


**This is only available locally here in Doha.**


And as I always say, after everything has been said and done, all we have are memories, right? so CREATE, CREATE, CREATE and put it on a SCRAPBOOK page!  -scrappy mommy ;)


TRAVEL FOLIO

Did I say I had fun making foto folios? And that's why I made another one! haha! This is style #5-The Envelope Top Loading Folio from Kathy Orta's Foto Folio Series Tutorial. I made a Travel Folio using Imaginisce Perfect Vacation paper collection and Simple Stories Sn@p Travel 4x6 Pocket Cards, and kraf-tex for the spine.


And it opens up like this,


You can fold the lower part to the back because I used kraf-tex for the spine of the two flaps. It has a large pocket and I made two photo mats to fit inside the pocket.


The album has 4 flaps in the middle that have pockets at the back and I placed 4 journaling cards inside the pockets. There are three flaps on each side, the left and right so you can have a spread like the second picture below.


On the inside, there are two side pockets which hold 2 pull-outs and have 2 small pockets in front that hold small journaling cards.


And the back looks like this,


Perfect to display photos from an unforgettable vacation and treasure keepsakes.

Please check out my youtube video for this album here:


I hope you like it!

**This album is already SOLD**


Thank you for stopping by!


And as I always say, after all has been said and done, all we have are memories, right? so CREATE, CREATE, CREATE and put it on a SCRAPBOOK page!  -scrappy mommy ;)


Thursday, August 27, 2015

BABY GIRL FOLIO

This is the second foto folio that I made using Kathy Orta of Paper Phenomenon's foto folio series tutorial. I used style #6 - The Triple Fold Folio which is a perfect style to document a baby boy or girl's first year. I made one for a baby girl and this folio comes with a storage box.


This album measures 9x11" and opens up like this,


On this album, there are flaps, pockets, pull-outs, tags and expandable envelopes and you can have a spread like this,


There are 6 expandable envelopes which you can all pull-out from the album


I used Pebbles Special Delivery Baby Girl Paper collection for this album and used kraf-tex for the spine. The album is so huge that I had only 2 pages left from the collection. I've been creative on this album, I've used my silhouette sketch pens on some pocket cards that I made myself because I thought the collection is enough and didn't buy any pocket cards. I made a large tag for each month to highlight the baby's development from her 1st month to 12th month.


And on the back I just mat it with a patterned paper and put my logo at the bottom. And because I've ran out of paper, I used different patterned paper on some part of the box. The storage box of this album makes it more flexible. You don't have to worry about how much stuff you will put inside the album because you can pull-out any envelope from the album and put it inside the box.


I had fun making this album. This album can hold tons of photos from wallet size to 5x7 photos. Perfect to document a baby's first year!

I hope you all like it!


You can watch my youtube video for the walkthrough of the whole album.


**This album is for sale, if you're interested you can post a comment on the comment box or you can click order on the menu and fill up the fields**

Thank you for stopping by!


And as I always say, after all has been said and done, all we have are memories, right? so CREATE, CREATE, CREATE and PUT IT ON A SCRAPBOOK PAGE! -scrappy mommy ;)

Saturday, August 15, 2015

BIRTHDAY FOLIO

I purchased Kathy Orta's Foto Folio series tutorial and made my very first foto folio. This is style #2 the matchbook style folio that I made for my baby's first birthday and also used it as a guestbook. I used Bo Bunny Surprise I want it all paper collection I bought from Foto Bella at Amazon. This folio can hold tons of photos and has pockets, wallet cards, flaps, pages, tags and photo mats. On the cover, there's a slit pocket on the left with two tags/photo mats and I place a piece of patterned paper on the right side on top of an orange cardstock and decorated it. I made a frame, which I cut from a 4x6 pocket card and adhere an acetate on the back and used a foam tape to make it look like a photo frame and put my baby's picture inside. I used the chip board pieces and stickers for her name and embellishments.


It opens like this..


On the upper part, there's a large pocket with photo mats or tags 


Two wallet cards with a waterfall photo mats inside and a pocket that you can pull out.


On the lower side, there are pockets which will hold your pages that are very expandable and you can make many pockets and pages as you like.


And on the back part there's a slit pocket where you can place tags/photo mats.


And at the back I just mat it with a patterned paper.


You can watch my youtube video for this album with photos on it here,


And voila! That's my birthday folio. Thank you for stopping by!


And let me just say, after all has been said and done, all we have are memories, right? so CREATE, CREATE, CREATE and PUT IT ON A SCRAPBOOK PAGE! -scrappy mommy ;)